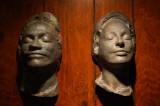
Life Masks
Summer, 2009
On one of our journeys to Portland, we came across artist
Beverly Toyu. She's a ceramic
artist who now specializes in making Life Masks.
Her web site has details of her
background, and how she came to this unusual art form. When we
saw examples of her work, we thought this would be a very interesting
alternative to the usual portrait photograph. It captures an unusual
perspective of what we look like today - and I think it will be fun to look back
on these masks in (hopefully) a decade or two. I'd love to get masks made
of the entire family.....but haven't had much luck convincing them yet.

Click on any if the images below for a larger picture.
 |
 |
 |
 |
| The first step is to make a plaster mold of your
face. Here, we're at Beverly's studio in Dayton, Oregon (near
McMinnville). Mo elected to go first. Bob Martin and
Betsy Seidel accompanied us on this trip. |
Beverly applies oil to the face, and fits
straws into your nose so you can breathe while the plaster is setting
up. That sounds a lot worse than it really is. |
Beverly has a very calming personality. During
the plaster process, she's constantly talking to you in a very
reassuring way. |
The oil allows the plaster to release without a lot
of effort. Here, she's having Mo hold the mask so it won't drop
when she sits up. |
 |
 |
 |
 |
| Gee, that was easy! It takes less then
ten minutes for the plaster to harden. |
Mo checks out the plaster mold. |
Now it's my turn. Beverly starts with a brief
face and scalp massage. That was the best part of the
process for me! |
She had a little trouble getting me fitted for "nose
straws". One nostril is apparently bigger than the other. |
 |
 |
 |
 |
| The plaster curing is exothermic, so your face gets a
little warm while it hardens. It's an odd sensation, but not at
all frightening. It is a little dark in there, though! |
Despite the liberal oiling, the plaster was hung up
on all my facial hair (my eyebrows and sideburns). We had to
tug on it a bit to get it to come off. |
And that one was easy, too! |
My turn to check out the mold. Is that me in
there? |
 |
 |
 |
 |
| About six weeks after making the mold, the finished
masks are ready. Mo said she didn't recognize herself. |
Mine was easy to pick out - big nose, and bushy
eyebrows. |
We choose the Raku glaze for the fired masks - it
results in an unpredictable metallic pattern that was unusual. |
|